Category: Nutrient and cllinary

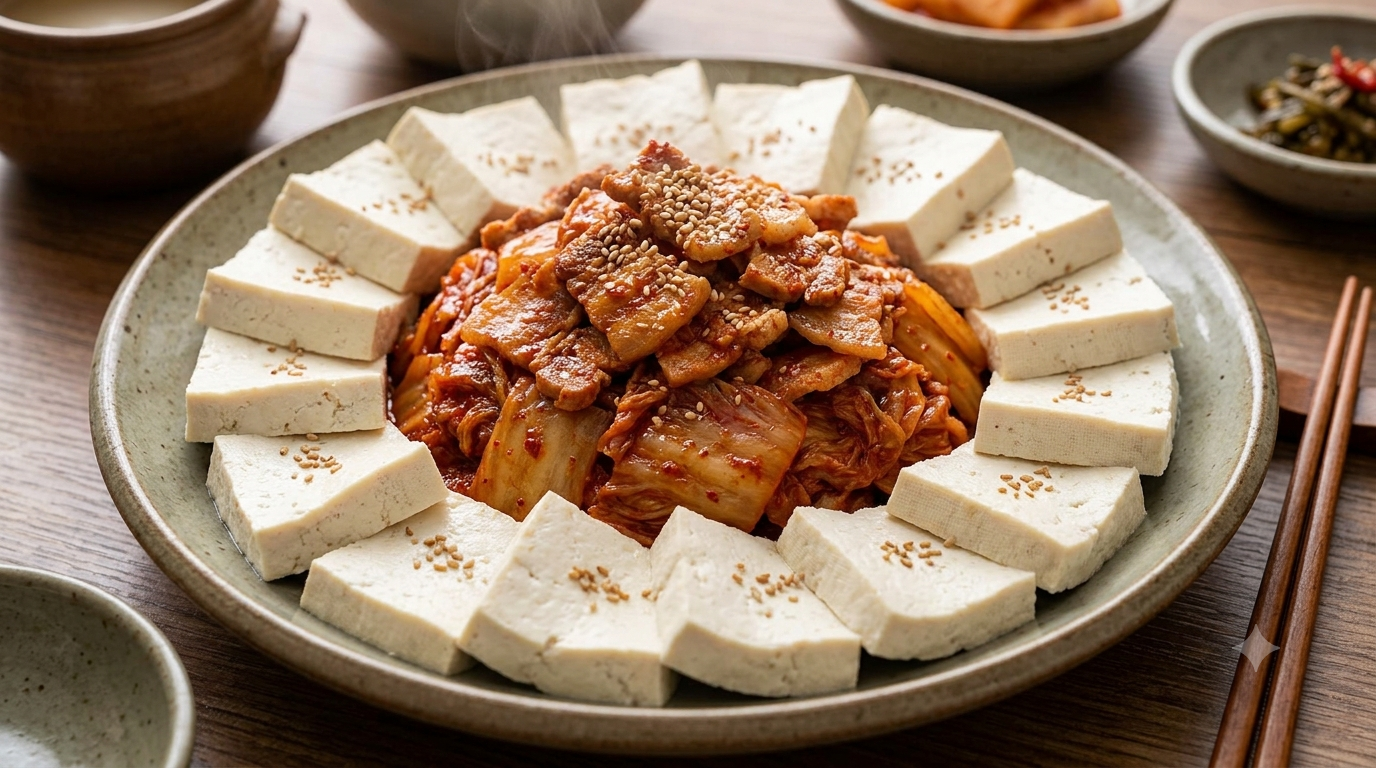
  • Dubu Kimchi: Warm Steamed Tofu Paired with Spicy Stir-Fried Pork and Kimchi

    Dubu Kimchi: Warm Steamed Tofu Paired with Spicy Stir-Fried Pork and Kimchi

    Dubu Kimchi: Warm Steamed Tofu with Spicy Stir-Fried Pork and Kimchi ๐ŸŒถ๏ธ

    Few Korean comfort foods deliver such a satisfying contrast as dubu kimchi: silky, warm tofu served alongside fiery stir-fried kimchi and savory pork. Each bite balances cool, delicate soybean richness with tangy fermented cabbage, smoky gochugaru, and tender pork. It is bold enough for dinner, shareable enough for drinks, and surprisingly easy to make at home.

    ๐Ÿ“œ The Korean History Behind Dubu Kimchi

    Dubu kimchi (๋‘๋ถ€๊น€์น˜) is a beloved Korean anju dishโ€”food traditionally enjoyed with drinks such as soju or makgeolli. While tofu has been part of Korean cooking for centuries, kimchi became the ideal partner because its bright fermentation cuts through tofuโ€™s mild, creamy texture.

    In Korean homes and casual pubs, dubu kimchi is often made with aged, well-fermented kimchi, which develops a deeper sourness and fuller flavor than fresh kimchi. Pork belly is a popular addition, although leaner pork, beef, mushrooms, or even tuna can be used. The dish is typically arranged with tofu around the edge of a platter and spicy kimchi pork piled in the centerโ€”simple, communal, and deeply comforting.

    ๐Ÿ›’ Ingredients for Authentic Dubu Kimchi

    • 14 ounces (400 g) firm or medium-firm tofu
    • 8 ounces (225 g) thinly sliced pork belly or pork shoulder
    • 2 cups well-fermented napa cabbage kimchi, roughly chopped
    • 1 small onion, thinly sliced
    • 2 scallions, sliced
    • 1 tablespoon neutral cooking oil
    • 1 tablespoon gochujang (Korean red pepper paste)
    • 1 teaspoon gochugaru (Korean red pepper flakes)
    • 1 tablespoon soy sauce
    • 1 teaspoon sugar or honey
    • 1 teaspoon toasted sesame oil
    • 1 teaspoon toasted sesame seeds

    ๐Ÿณ How to Make Dubu Kimchi Step by Step

    1. Prepare the tofu ๐Ÿฅข
      Drain the tofu and pat it dry. Cut it into thick, bite-sized rectangles. Bring a pot of water to a gentle simmer, add a pinch of salt, and warm the tofu for 4 to 5 minutes. This keeps it soft, warm, and less likely to break.

    2. Mix the spicy seasoning ๐ŸŒถ๏ธ
      In a small bowl, combine gochujang, gochugaru, soy sauce, sugar, and sesame oil. This quick sauce adds the signature sweet, savory, and spicy depth of Korean pork kimchi stir-fry.

    3. Sear the pork ๐Ÿ”ฅ
      Heat oil in a large skillet over medium-high heat. Add the pork and cook for 4 to 5 minutes, stirring occasionally, until lightly browned and fragrant. Pork belly will release its own fat; if using a lean cut, keep the oil in the pan.

    4. Stir-fry kimchi and onion ๐Ÿฒ
      Add the sliced onion and chopped kimchi to the skillet. Cook for 3 to 4 minutes until the onion softens and the kimchi begins to caramelize around the edges.

    5. Add the sauce
      Pour in the prepared seasoning mixture and toss thoroughly. Stir-fry for another 2 to 3 minutes, allowing the sauce to cling to the pork and kimchi. Add half the scallions and stir once more.

    6. Plate and serve โœจ
      Drain the warmed tofu carefully and arrange it around a large serving plate. Spoon the spicy pork kimchi into the center. Finish with sesame seeds and the remaining scallions. Serve immediately with steamed rice, lettuce leaves, or Korean perilla leaves.

    ๐Ÿ’š Health Benefits and Smart Cooking Tips

    Dubu kimchi offers a flavorful combination of protein, probiotics, and plant-based nutrients. Tofu provides complete plant protein, iron, and calcium when calcium-set tofu is used. Fermented kimchi may support gut health through beneficial bacteria, while garlic, scallions, and chili peppers contribute antioxidant compounds.

    • Choose aged kimchi: Sour, mature kimchi gives this dish its richest restaurant-style flavor.
    • Control the heat: Reduce gochugaru for a milder dish, or add extra for a more fiery Korean pub-style result.
    • Keep tofu warm: Serve it soon after simmering; cold tofu does not create the same comforting contrast.
    • Make it vegetarian: Replace pork with shiitake mushrooms, oyster mushrooms, or crumbled extra-firm tofu.

    โ“ Dubu Kimchi FAQ

    What is the best pork cut for dubu kimchi?

    Pork belly is the traditional favorite because its fat enriches the kimchi. Pork shoulder is an excellent, meatier alternative, while thinly sliced pork loin works well for a lighter version.

    Can I make dubu kimchi ahead of time?

    Yes. Prepare the pork kimchi stir-fry up to two days ahead and refrigerate it in an airtight container. Reheat it in a skillet with a splash of water. Warm the tofu just before serving for the best texture.

    Can I use soft tofu instead of firm tofu?

    You can use soft tofu, but handle it gently. Firm or medium-firm tofu is easier to slice, plate, and eat with the saucy pork kimchi mixture.

    What can I serve with dubu kimchi?

    Steamed short-grain rice, lettuce wraps, perilla leaves, cucumber salad, and Korean seaweed sheets are all excellent accompaniments. For a casual Korean-style spread, add pickled radish and a bowl of rice.

    Is dubu kimchi gluten-free?

    It can be. Use gluten-free tamari instead of regular soy sauce, and check that your gochujang and kimchi are certified gluten-free, as some brands contain wheat-based ingredients.

    ๐Ÿฅฌ Recommended Ingredients

    Bring home the vibrant flavor of Korea with authentic fermented kimchi, gochujang, gochugaru, and fragrant toasted sesame oil for your best dubu kimchi yet.

    ๐Ÿ‘‰ Shop Fresh Ingredients on Amazon

    ๐Ÿณ Recommended Kitchen Tools

    A dependable skillet and a sturdy tofu-friendly spatula make it easy to build deeply caramelized kimchi flavor without breaking delicate tofu.

    ๐Ÿ‘‰ Check Out Essential Cooking Tools on Amazon

    * Disclaimer: As an Amazon Associate, I earn from qualifying purchases at no additional cost to you.

    TAGS: #DubuKimchi, #KoreanFood, #TofuRecipes, #KimchiRecipe, #SpicyPork
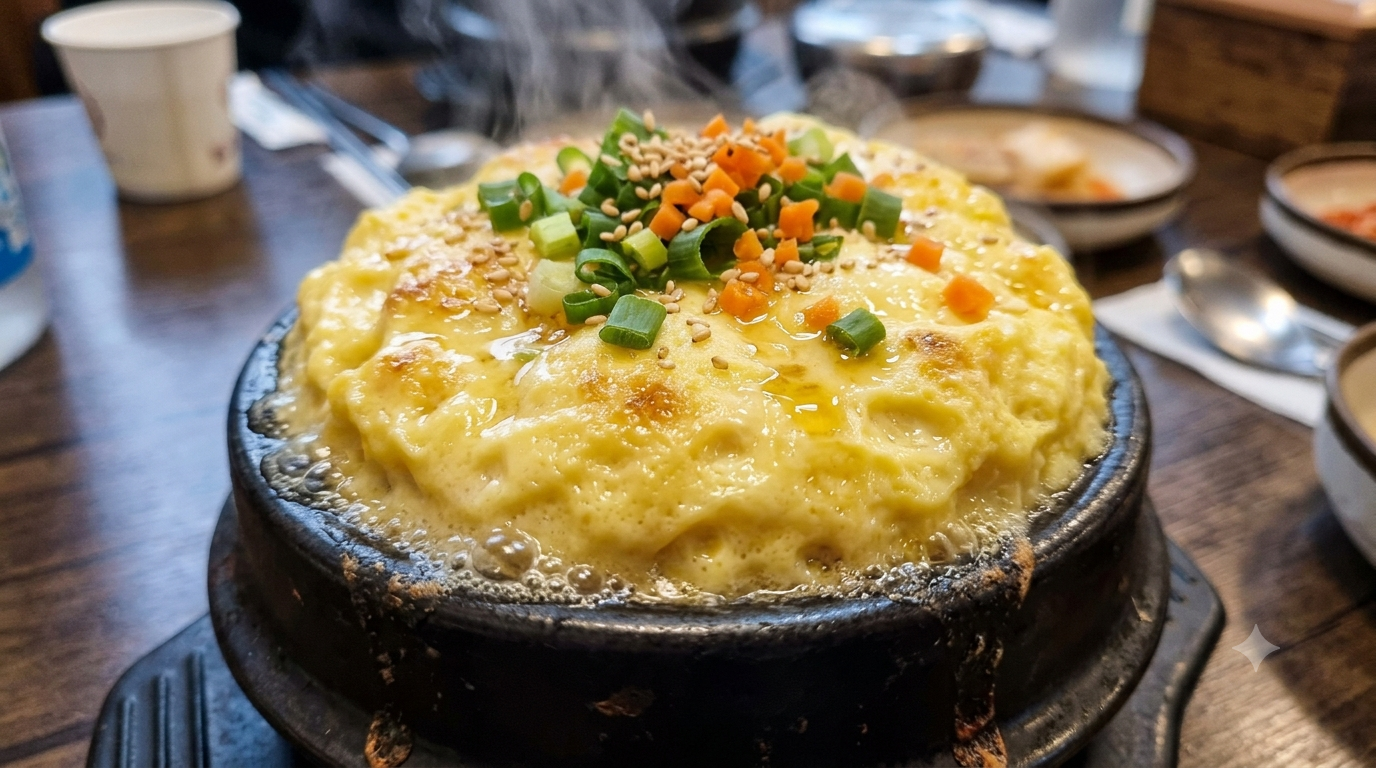
  • Gyeran-jjim: Fluffy and Savory Korean Volcano Steamed Eggs

    Gyeran-jjim: Fluffy and Savory Korean Volcano Steamed Eggs

    Gyeran-jjim: Fluffy and Savory Korean Volcano Steamed Eggs ๐ŸŒ‹๐Ÿฅš

    Soft enough to scoop with a spoon, savory enough to steal the spotlight, and dramatically puffed like a tiny volcanoโ€”gyeran-jjim is one of Koreaโ€™s most comforting egg dishes. This Korean steamed egg recipe turns a few everyday ingredients into a cloud-like side dish with a gently custardy center, ideal alongside rice, grilled meat, kimchi, or a warming bowl of soup.

    Often served in a sizzling earthenware pot called a ttukbaegi, volcano gyeran-jjim rises high above the rim as steam expands through the whisked egg mixture. It is quick, affordable, family-friendly, and wonderfully adaptableโ€”exactly the kind of Korean comfort food worth mastering at home.

    ๐Ÿ“œ The History of Korean Steamed Eggs

    Gyeran-jjim (๊ณ„๋ž€์ฐœ) literally means โ€œsteamed eggsโ€ in Korean. It has long been a familiar banchan, or Korean side dish, appearing on home tables and in Korean barbecue restaurants throughout South Korea. While eggs were once considered a valued ingredient in Korean households, the dish became especially popular because it could stretch a small number of eggs into a nourishing shared side.

    Traditional versions are made by slowly steaming beaten eggs with water or anchovy-kelp broth. Modern restaurant-style gyeran-jjim often uses a stovetop method in a ttukbaegi, producing the beloved fluffy โ€œvolcanoโ€ dome. The dish is especially popular in Seoul barbecue restaurants, where its mild, silky flavor balances spicy pork belly, smoky bulgogi, and fermented kimchi.

    ๐Ÿ›’ Ingredients for Fluffy Gyeran-jjim

    • 4 large eggs
    • 1 cup warm anchovy-kelp broth, chicken broth, or water
    • 1/2 teaspoon salt, or to taste
    • 1 teaspoon fish sauce or Korean soup soy sauce (optional, but deeply savory)
    • 2 tablespoons finely chopped scallions
    • 1 tablespoon finely diced carrot or zucchini (optional)
    • 1 teaspoon toasted sesame oil
    • 1 teaspoon toasted sesame seeds for garnish

    Best vessel: A small Korean earthenware bowl or 5- to 6-inch saucepan with a lid. A deep bowl helps create the classic puffed volcano shape.

    ๐Ÿณ How to Make Korean Volcano Steamed Eggs

    1. Whisk the eggs smoothly ๐Ÿฅš
      Crack the eggs into a medium bowl. Add salt and fish sauce, then whisk until the yolks and whites are fully combined. For an exceptionally silky texture, strain the mixture through a fine-mesh sieve.
    2. Add warm broth ๐Ÿ’ง
      Slowly whisk in the warm broth or water. A ratio of about one part egg to one part liquid creates a tender, spoonable custard. Stir in most of the scallions and any diced vegetables, reserving a little scallion for the top.
    3. Start over gentle heat ๐Ÿ”ฅ
      Lightly grease your ttukbaegi or small saucepan with a few drops of sesame oil. Pour in the egg mixture and place the pot over low heat. Stir gently for the first 2 to 3 minutes, scraping the bottom to prevent curds from setting too quickly.
    4. Cover and steam until puffed ๐ŸŒ‹
      Once small curds begin to form around the edges, stop stirring. Cover with a lid and cook on the lowest heat for 6 to 8 minutes. The eggs should slowly rise into a soft dome. Avoid lifting the lid repeatedly, as trapped steam creates the signature lift.
    5. Finish with aroma and color โœจ
      Turn off the heat when the center is just set but still jiggles slightly. Let it rest, covered, for 1 minute. Drizzle with sesame oil and scatter over sesame seeds and reserved scallions.
    6. Serve immediately ๐Ÿš
      Bring the pot to the table while it is still puffed and steaming. Serve with hot rice, kimchi, grilled short ribs, or spicy Korean tofu stew.

    ๐ŸŒฟ Health Benefits and Smart Cooking Tips

    Eggs provide high-quality protein, vitamin B12, choline, and selenium. Because gyeran-jjim is steamed rather than fried, it needs very little oil. Adding scallions, carrots, zucchini, or finely chopped mushrooms brings extra color, fiber, and micronutrients without overpowering the delicate egg flavor.

    • Keep the heat low: High heat creates holes, rubbery curds, and a scorched base.
    • Use broth for depth: Korean anchovy-kelp stock gives the most traditional savory flavor.
    • Do not overcook: Remove the pot when the center still trembles slightly; residual heat will finish it.
    • For a taller dome: Use a narrower, deeper pot and keep the lid closed during cooking.
    • For children: Skip fish sauce and use mild chicken broth or water with a pinch of salt.

    โ“ Gyeran-jjim FAQ

    What makes gyeran-jjim rise like a volcano?

    The dramatic rise comes from steam trapped in the covered pot. Low, steady heat cooks the egg gradually while steam expands throughout the mixture. A deep ttukbaegi or small saucepan helps support the tall, fluffy dome.

    Can I make Korean steamed eggs without a ttukbaegi?

    Yes. Use a small heavy-bottomed saucepan with a tight-fitting lid, a heatproof bowl set in a steamer, or an oven-safe ramekin in a water bath. A ttukbaegi is traditional, but it is not required for creamy results.

    Can I make gyeran-jjim ahead of time?

    Gyeran-jjim tastes best freshly cooked, when it is light and puffed. You can whisk the eggs and vegetables up to one day ahead and refrigerate them, but cook the dish just before serving. Reheated steamed eggs are safe but less airy.

    What can I substitute for anchovy-kelp broth?

    Use low-sodium chicken broth, vegetable broth, dashi, or plain water. If using water, add a small amount of fish sauce, soup soy sauce, or a pinch of salt to maintain the savory Korean-style flavor.

    Why did my steamed eggs become watery or rubbery?

    Watery gyeran-jjim usually needs a little longer cooking time, while rubbery eggs are often caused by excessive heat or overcooking. Cook slowly over low heat and remove the pot as soon as the center is softly set.

    ๐Ÿฅฌ Recommended Ingredients

    Bring authentic Korean comfort-food flavor to your kitchen with flavorful anchovy-kelp stock, Korean soup soy sauce, and toasted sesame oil.

    ๐Ÿ‘‰ Shop Fresh Ingredients on Amazon

    ๐Ÿฒ Recommended Kitchen Tools

    A traditional Korean ttukbaegi helps create the beautifully puffed, restaurant-style volcano effect while keeping your steamed eggs warm at the table.

    ๐Ÿ‘‰ Check Out Essential Cooking Tools on Amazon

    * Disclaimer: As an Amazon Associate, I earn from qualifying purchases at no additional cost to you.

    TAGS: #GyeranJjim, #KoreanFood, #SteamedEggs, #KoreanRecipes, #ComfortFood

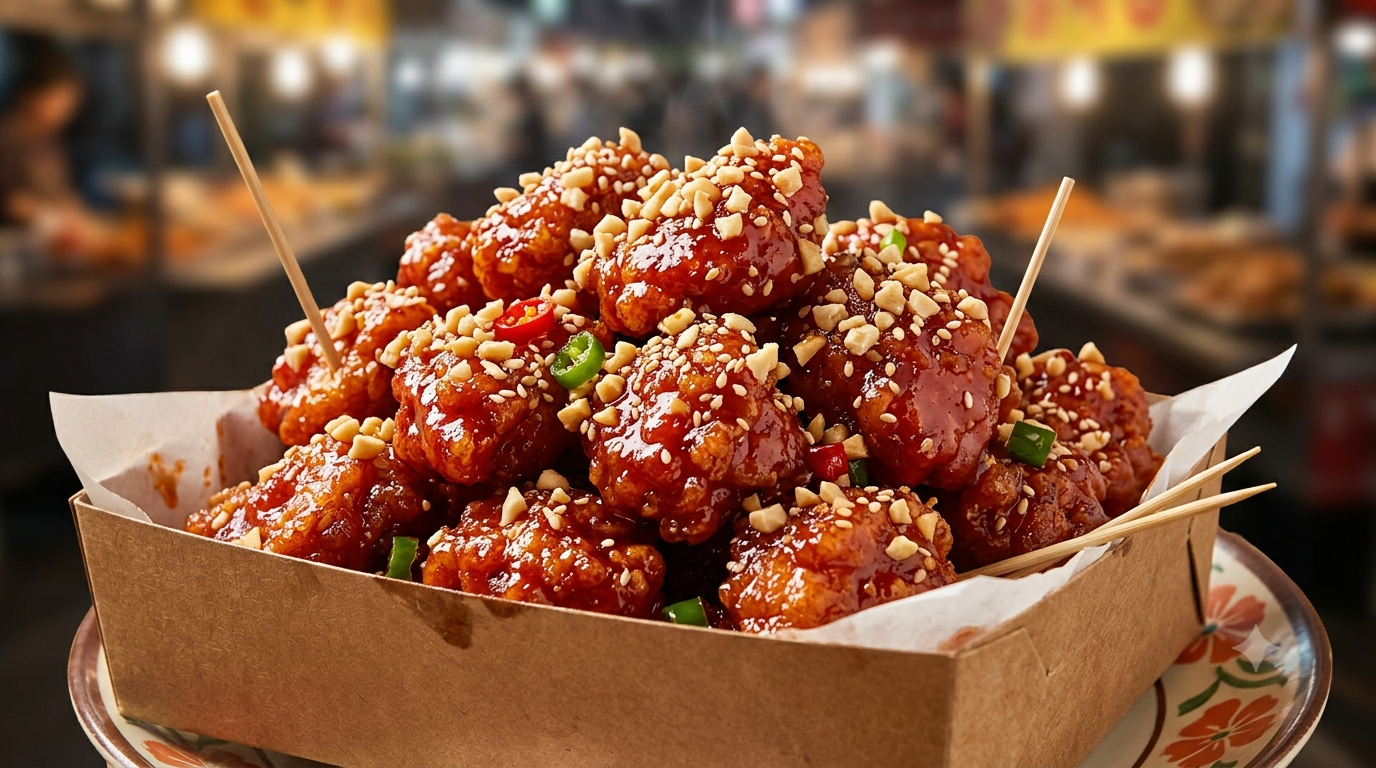
  • Dakgangjeong: Crispy Sweet and Spicy Glazed Korean Popcorn Chicken

    Dakgangjeong: Crispy Sweet and Spicy Glazed Korean Popcorn Chicken

    Dakgangjeong: Crispy Sweet and Spicy Korean Popcorn Chicken ๐Ÿ—

    Dakgangjeong is the Korean fried chicken dish that delivers everything in one irresistible bite: a shatteringly crisp coating, tender juicy chicken, and a glossy glaze that balances sweet, savory, garlicky, and gently spicy flavors. Often compared to Korean popcorn chicken, this crowd-pleasing dish is perfect for game nights, casual dinners, or a vibrant addition to a Korean-inspired spread.

    ๐Ÿ“œ The History Behind Dakgangjeong

    โ€œDakโ€ means chicken in Korean, while โ€œgangjeongโ€ refers to a traditional Korean confection or snack often coated in syrup. Dakgangjeong takes inspiration from this sticky, glossy preparation style, pairing deep-fried chicken with a sweet sauce that clings to every crunchy piece.

    Although fried chicken became increasingly popular in Korea during the twentieth century, Korean cooks made it distinctly their own with double-frying techniques and bold sauces featuring gochujang, soy sauce, garlic, and Korean rice syrup. Today, dakgangjeong is a beloved market snack and late-night comfort food across South Korea, often served in paper cups with toothpicks for easy sharing.

    ๐Ÿ›’ Ingredients for Sweet and Spicy Korean Popcorn Chicken

    • 1ยฝ pounds boneless, skinless chicken thighs, cut into bite-size pieces
    • ยฝ teaspoon salt
    • ยผ teaspoon black pepper
    • 1 tablespoon grated fresh ginger
    • ยพ cup potato starch or cornstarch
    • Neutral frying oil, such as canola, avocado, or vegetable oil
    • 2 tablespoons gochujang (Korean red chili paste)
    • 2 tablespoons soy sauce
    • 3 tablespoons Korean rice syrup or honey
    • 2 tablespoons ketchup
    • 3 garlic cloves, finely minced
    • 1 tablespoon rice vinegar
    • 1 tablespoon toasted sesame seeds
    • 2 sliced green onions, for garnish

    ๐Ÿ‘ฉโ€๐Ÿณ How to Make Dakgangjeong Step by Step

    1. Season the chicken. Place the chicken pieces in a bowl and season with salt, black pepper, and grated ginger. Toss well, then let the chicken rest for 10 to 15 minutes. This quick marinade adds flavor without making the coating wet.

    2. Coat with starch. ๐Ÿฅฃ Add potato starch to the chicken in batches, tossing until every piece is evenly coated. Shake off excess starch. Potato starch creates the lightest, crispiest Korean-style crust, but cornstarch works well too.

    3. Heat the oil. Pour 2 to 3 inches of oil into a deep, heavy pot. Heat to 325ยฐF (165ยฐC). Frying at a moderate temperature first cooks the chicken through without over-browning the crust.

    4. First fry the chicken. ๐Ÿ— Fry the coated chicken in small batches for 4 to 5 minutes, until pale golden and cooked through. Do not crowd the pot; overcrowding lowers the oil temperature and creates soggy chicken. Transfer to a wire rack.

    5. Fry a second time for extra crunch. โœจ Raise the oil temperature to 375ยฐF (190ยฐC). Fry the chicken again for 2 to 3 minutes until deeply golden, crisp, and audibly crackly. Drain well on a rack.

    6. Make the glaze. In a large skillet over medium-low heat, combine gochujang, soy sauce, rice syrup, ketchup, garlic, and rice vinegar. Stir for 2 to 3 minutes until the sauce becomes smooth, bubbling, and slightly thickened.

    7. Toss and serve immediately. ๐ŸŒถ๏ธ Add the double-fried chicken to the skillet and toss quickly until coated in the shiny sauce. Sprinkle with sesame seeds and green onions. Serve hot with pickled radish, steamed rice, or crisp lettuce cups.

    ๐ŸŒฟ Health Benefits and Smart Cooking Tips

    Dakgangjeong is an indulgent dish, but it also offers valuable protein from chicken and antioxidant-rich compounds from garlic, ginger, and gochujang. Gochujang contains fermented ingredients that provide deep umami flavor, meaning you can create a satisfying sauce without relying on excessive salt.

    • Choose chicken thighs for the juiciest result; they stay tender even after double frying.
    • For a lighter version, air-fry or bake the starch-coated chicken, then toss it with the warm glaze.
    • Adjust the heat by using 1 tablespoon of gochujang for mild flavor or adding Korean chili flakes for more fire.
    • Keep the sauce and fried chicken separate until serving to preserve the signature crunch.

    โ“ Dakgangjeong FAQ

    What is the best cut of chicken for dakgangjeong?

    Boneless, skinless chicken thighs are the best choice because they remain moist and flavorful during frying. Chicken breast can be used, but it cooks faster and may become dry if overfried.

    Can I make dakgangjeong ahead of time?

    You can prepare the sauce up to three days ahead and store it in the refrigerator. For the best texture, fry and glaze the chicken just before serving. Reheating glazed chicken may soften the coating.

    Can I substitute gochujang with another ingredient?

    Gochujang has a uniquely fermented, sweet-spicy flavor, so it is difficult to replace exactly. In a pinch, mix sriracha with a little miso paste and honey, though the result will taste less traditionally Korean.

    Why is my Korean popcorn chicken not crispy?

    The usual causes are wet chicken, too little starch, overcrowding the fryer, or skipping the second fry. Pat chicken dry before seasoning, fry in batches, and always double-fry for the crispiest finish.

    How spicy is dakgangjeong?

    Dakgangjeong is usually mildly to moderately spicy, with sweetness balancing the gochujang. It is easy to customize: reduce gochujang for a family-friendly batch or add chili flakes for extra heat.

    ๐Ÿฅข Recommended Ingredients

    Bring authentic Korean flavor to your kitchen with fresh gochujang, Korean rice syrup, toasted sesame seeds, and pantry staples selected for a deeply flavorful dakgangjeong glaze.

    ๐Ÿ‘‰ Shop Fresh Ingredients on Amazon

    ๐Ÿณ Recommended Kitchen Tools

    Make double-frying safer and easier with a deep pot, reliable thermometer, wire rack, and spider skimmerโ€”essential tools for achieving crisp, restaurant-worthy Korean fried chicken.

    ๐Ÿ‘‰ Check Out Essential Cooking Tools on Amazon

    * Disclaimer: As an Amazon Associate, I earn from qualifying purchases at no additional cost to you.

    TAGS: #Dakgangjeong, #KoreanFriedChicken, #KoreanFood, #Gochujang, #PopcornChicken

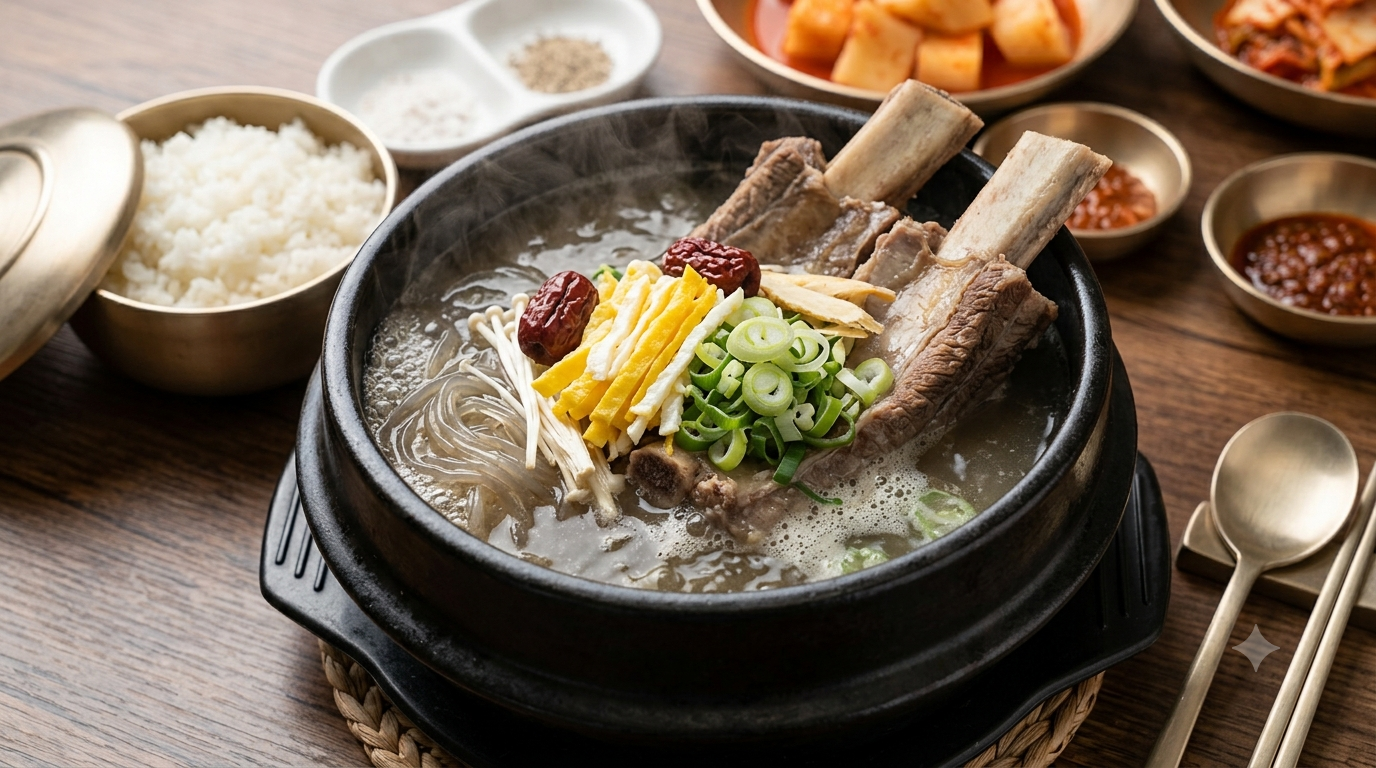
  • Galbitang: Clear and Nourishing Korean Beef Short Rib Soup with Tender Meat

    Galbitang: Clear and Nourishing Korean Beef Short Rib Soup with Tender Meat

    Galbitang: Clear and Nourishing Korean Beef Short Rib Soup with Tender Meat

    When comfort calls for something deeply satisfying yet refreshingly light, Galbitang answers with a clear, savory broth and fall-apart tender beef short ribs. This beloved Korean soup is a celebration of patience: beef bones and ribs simmer slowly until their flavor turns the water into a clean, golden, nourishing bowl of comfort. ๐Ÿฒ

    ๐Ÿ“œ The History of Galbitang

    Galbitang (๊ฐˆ๋น„ํƒ•) literally means โ€œshort rib soupโ€ in Korean. While beef short ribs were historically considered a premium ingredient, this soup became associated with celebratory meals, family gatherings, and special occasions in Korea. Traditional versions were often served at restaurants specializing in galbi, where the same prized ribs used for grilling could be transformed into a soothing soup.

    Unlike spicy Korean stews, Galbitang relies on restraint. Its signature is a clear, clean-tasting beef broth, typically seasoned lightly with Korean soup soy sauce, garlic, scallions, black pepper, and salt. Diners often season their own bowls at the table, then enjoy the soup with steamed rice and crisp kimchi.

    ๐Ÿฅ˜ Classic Galbitang Recipe

    This home-style Galbitang recipe serves 4 and creates a fragrant, restaurant-worthy broth with tender Korean-style beef short ribs, daikon radish, and glass noodles.

    Ingredients

    • 3 pounds bone-in beef short ribs, cut Korean-style
    • 12 cups cold water, plus more for soaking
    • 1 medium Korean radish or daikon, peeled and cut into large chunks
    • 1 small onion, halved
    • 6 garlic cloves, lightly crushed
    • 2 scallions, cut into 2-inch pieces, plus more for garnish
    • 2 tablespoons Korean soup soy sauce (guk ganjang)
    • 1 teaspoon salt, or to taste
    • 1/2 teaspoon ground black pepper
    • 4 ounces sweet potato glass noodles (dangmyeon), optional
    • 2 eggs, thinly cooked into omelets and sliced, optional garnish
    • Cooked short-grain rice and kimchi, for serving

    ๐Ÿ‘ฉโ€๐Ÿณ Step-by-Step: How to Make Galbitang

    1. Soak the ribs. ๐Ÿ’ง Place the short ribs in a large bowl and cover with cold water. Soak for 1 to 2 hours, changing the water once or twice. This classic step helps remove excess blood for a cleaner, clearer broth.
    2. Blanch the beef. Transfer the soaked ribs to a stockpot, cover with fresh water, and bring to a rapid boil for 5 minutes. Drain the ribs, rinse them thoroughly under cold water, and clean the pot to remove any foam or impurities.
    3. Build the broth. ๐Ÿฒ Return the cleaned ribs to the pot. Add 12 cups of cold water, onion, garlic, and scallion pieces. Bring to a boil over high heat, then reduce to a gentle simmer.
    4. Simmer until tender. Cover partially and simmer for 1 1/2 to 2 hours. Skim off any foam or visible fat occasionally. The ribs are ready when the meat is tender and easily pulls away from the bone.
    5. Add the radish. Add the daikon or Korean radish during the final 30 to 40 minutes of cooking. It should become tender while adding subtle sweetness to the broth.
    6. Season lightly. Remove the onion and scallion pieces. Stir in Korean soup soy sauce, salt, and black pepper. Taste before adding more salt; Galbitang should be delicately seasoned, not overly salty.
    7. Prepare the noodles. Soak glass noodles in warm water for 15 minutes, then cook according to package directions. Divide them between serving bowls.
    8. Serve beautifully. โœจ Ladle hot broth, ribs, and radish over the noodles. Top with sliced scallions and optional egg strips. Serve immediately with steamed rice, kimchi, and a small dish of extra salt and pepper.

    ๐ŸŒฟ Health Benefits and Practical Tips

    Galbitang offers a balanced combination of protein, iron, zinc, and collagen-rich connective tissue from slow-cooked beef ribs. Daikon contributes fiber and vitamin C, while garlic and scallions add aromatic flavor without requiring heavy sauces. Although beef broth can be rich, skimming fat during cooking and chilling leftovers before reheating makes it easier to remove excess surface fat.

    • For the clearest broth: never skip soaking, blanching, and rinsing the ribs.
    • For deeper flavor: simmer gently rather than boiling aggressively, which can cloud the broth.
    • For a faster version: use a pressure cooker and cook the blanched ribs for about 35 to 40 minutes.
    • For meal prep: make the broth one day ahead; its flavor improves overnight.

    โ“ Galbitang FAQ

    What is the best cut of beef for Galbitang?

    Bone-in beef short ribs cut across the bone in Korean-style pieces are the best choice. The bones, marrow, and connective tissue create Galbitangโ€™s characteristic rich but clear broth. English-cut short ribs can also work, though they may need a longer cooking time.

    Can I make Galbitang ahead of time?

    Yes. Galbitang is excellent for make-ahead meals. Cool it completely, refrigerate it overnight, and remove the solidified fat from the surface before reheating. Store noodles separately so they do not absorb too much broth.

    Can I substitute regular soy sauce for Korean soup soy sauce?

    You can, but use less because regular soy sauce is darker and may make the broth look less clear. Start with 1 tablespoon of low-sodium soy sauce, then adjust with salt. Korean soup soy sauce provides the most authentic flavor and pale golden color.

    Is Galbitang spicy?

    No. Traditional Galbitang is a mild, non-spicy Korean beef soup. If you enjoy heat, serve it with kimchi or add sliced fresh chili peppers at the table.

    What should I serve with Korean short rib soup?

    Steamed short-grain rice, napa cabbage kimchi, cubed radish kimchi (kkakdugi), and simple seasoned vegetables are classic pairings. The bright acidity of kimchi is especially delicious with the savory broth.

    ๐Ÿฅฌ Recommended Ingredients

    Bring authentic Korean flavor to your Galbitang with fresh beef short ribs, Korean radish, glass noodles, and traditional guk ganjang.

    ๐Ÿ‘‰ Shop Fresh Ingredients on Amazon

    ๐Ÿณ Recommended Kitchen Tools

    A large stockpot, fine skimmer, and traditional Korean soup bowls make slow-simmered Galbitang easier to prepare and more enjoyable to serve.

    ๐Ÿ‘‰ Check Out Essential Cooking Tools on Amazon

    * Disclaimer: As an Amazon Associate, I earn from qualifying purchases at no additional cost to you.

    TAGS: #Galbitang, #KoreanFood, #BeefShortRibSoup, #KoreanRecipes, #ComfortFood

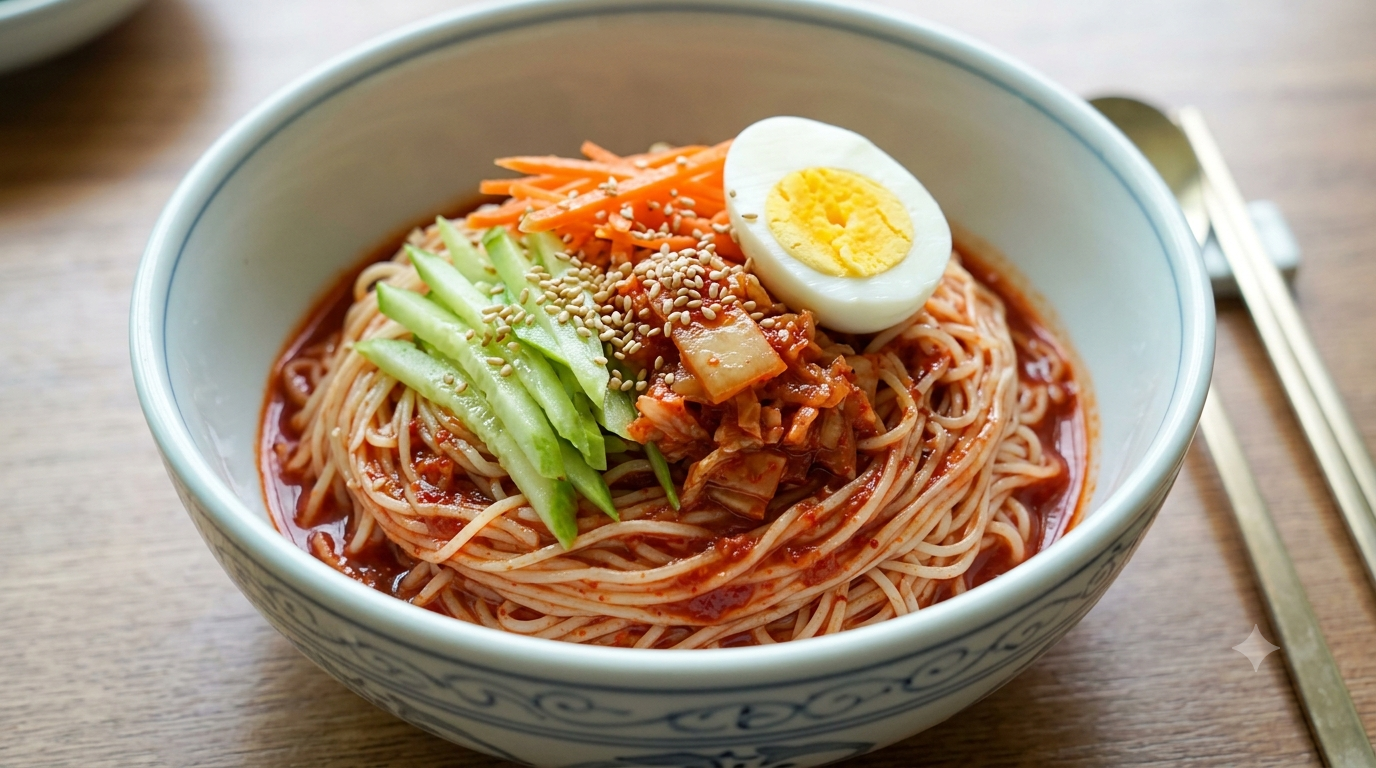
  • Bibim Guksu: Sweet, Tangy, and Spicy Korean Cold Mixed Noodles

    Bibim Guksu: Sweet, Tangy, and Spicy Korean Cold Mixed Noodles

    Bibim Guksu: Sweet, Tangy, and Spicy Korean Cold Mixed Noodles ๐ŸŒถ๏ธ๐Ÿœ

    When summer heat calls for something bright, bold, and instantly refreshing, Bibim Guksu answers with a lively kick. This beloved Korean cold noodle dish combines thin wheat noodles with a glossy red sauce that is sweet, tangy, savory, and spicy all at once. Finished with crisp cucumber, chewy egg, and toasted sesame seeds, it is the kind of fast, flavor-packed meal that makes an ordinary weekday feel like a Korean summer feast.

    Ready in about 20 minutes, Korean spicy cold noodles are ideal for hot weather lunches, easy dinners, barbecue side dishes, or a satisfying late-night bowl. The secret is balance: spicy gochujang, sharp vinegar, a little sugar, and nutty sesame oil create a sauce that clings beautifully to chilled noodles.

    ๐Ÿ“œ The History and Tradition of Bibim Guksu

    Bibim means โ€œmixedโ€ in Korean, while guksu means โ€œnoodles.โ€ Bibim Guksu is part of Koreaโ€™s wide family of mixed noodle dishes, valued for their flexibility, affordability, and bold seasoning. Although cold noodle traditions are especially associated with dishes such as naengmyeon, Bibim Guksu is generally simpler and more accessible, typically made with thin wheat noodles known as somyeon.

    Its flavor profile reflects classic Korean pantry staples: fermented chili paste, sesame oil, garlic, soy sauce, and vinegar. In Korean homes, the dish is often prepared during warmer months when lighter meals feel especially welcome. It is also a smart way to use fresh seasonal vegetables, kimchi, or leftover protein. Today, Bibim Guksu is enjoyed around the world as a quick introduction to the vivid, craveable flavors of Korean cuisine.

    ๐Ÿงพ Ingredients for Authentic Bibim Guksu

    • 7 ounces (200 g) somyeon or thin wheat noodles
    • 2 tablespoons gochujang (Korean red chili paste)
    • 1 tablespoon gochugaru (Korean red pepper flakes), optional
    • 1 tablespoon rice vinegar or apple cider vinegar
    • 1 tablespoon soy sauce
    • 1 to 1ยฝ tablespoons sugar or honey
    • 1 tablespoon sesame oil
    • 1 garlic clove, finely grated or minced
    • 1 teaspoon toasted sesame seeds
    • 1 small cucumber, julienned
    • 1 hard-boiled egg, halved
    • Kimchi, shredded lettuce, sliced pear, or roasted seaweed, optional

    ๐Ÿœ How to Make Bibim Guksu Step by Step

    1. Prepare the toppings ๐Ÿฅ’
      Julienne the cucumber and prepare your hard-boiled egg. If using kimchi, squeeze out excess liquid and chop it into bite-size pieces. Set everything aside in the refrigerator so the final bowl stays cool and crisp.
    2. Mix the spicy bibim sauce ๐ŸŒถ๏ธ
      In a large mixing bowl, whisk together gochujang, optional gochugaru, vinegar, soy sauce, sugar, sesame oil, garlic, and sesame seeds. Taste the sauce. Add more sugar for sweetness, vinegar for tang, or gochujang for a deeper spicy flavor.
    3. Cook the noodles โฒ๏ธ
      Bring a large pot of water to a boil. Add the somyeon noodles and cook according to package instructions, usually 3 to 4 minutes. Stir early to prevent the noodles from clumping.
    4. Rinse until ice-cold โ„๏ธ
      Drain the noodles in a fine mesh strainer, then rinse thoroughly under very cold running water. Rub the noodles gently between your hands to remove excess starch. For the most refreshing texture, rinse once more with ice water.
    5. Drain very well
      Shake off as much water as possible. Watery noodles will dilute the sauce, so this small step makes a major difference in achieving a restaurant-style Bibim Guksu.
    6. Toss and serve โœจ
      Add the chilled noodles to the sauce and toss until every strand is coated in red, glossy seasoning. Divide into bowls and top with cucumber, egg, kimchi, extra sesame seeds, and roasted seaweed if desired. Serve immediately.

    ๐Ÿ’š Health Benefits and Smart Cooking Tips

    Bibim Guksu can be a balanced meal when paired with vegetables and protein. Cucumber adds hydration and crunch, while eggs provide protein and essential nutrients. Gochujang contains fermented ingredients and delivers a satisfying depth of flavor, meaning you can create a bold dish without relying heavily on rich sauces.

    • Control the heat: Start with less gochujang if you are sensitive to spice, then adjust gradually.
    • Add protein: Top with grilled chicken, bulgogi beef, tofu, canned tuna, or shredded rotisserie chicken.
    • Keep it cold: Chill serving bowls for 10 minutes before plating, especially on hot days.
    • Make it vegan: Use maple syrup or sugar instead of honey and replace the egg with tofu or edamame.
    • Use the right noodle: Thin somyeon gives the dish its classic light, springy texture.

    โ“ Bibim Guksu FAQ

    What noodles are best for Bibim Guksu?

    Somyeon, thin Korean wheat noodles, are the traditional choice for Bibim Guksu. Japanese somen noodles are the closest substitute. Avoid thick pasta, as it will not hold the light, spicy sauce in the same way.

    Can I make Bibim Guksu ahead of time?

    You can make the sauce and prep toppings up to one day ahead. However, cook and rinse the noodles just before serving for the best texture. If necessary, store cooked noodles separately with a few drops of sesame oil, then toss with the sauce right before eating.

    How do I make Bibim Guksu less spicy?

    Reduce the gochujang to 1 tablespoon and skip the gochugaru. Add a little extra sugar, honey, grated pear, or apple juice to soften the heat while maintaining the dishโ€™s signature sweet-tangy flavor.

    Can I use kimchi in spicy Korean cold noodles?

    Yes. Kimchi adds acidity, crunch, and fermented depth. Finely chop well-drained kimchi and toss it directly into the noodles, or use it as a topping for a more layered presentation.

    What should I serve with Bibim Guksu?

    Serve it with Korean barbecue, mandu dumplings, grilled fish, crispy tofu, or a simple bowl of chilled broth. For a quick summer meal, Bibim Guksu is also delicious on its own with a generous topping of cucumber and egg.

    Recommended Ingredients ๐Ÿ›’

    Bring authentic Korean flavor to your kitchen with fresh somyeon noodles, quality gochujang, toasted sesame oil, and Korean chili flakes for the most vibrant Bibim Guksu.

    ๐Ÿ‘‰ Shop Fresh Ingredients on Amazon

    Recommended Kitchen Tools ๐Ÿณ

    A reliable pot and a stainless-steel mesh strainer are essential for boiling and thoroughly chilling noodles, giving your Bibim Guksu its signature springy texture.

    ๐Ÿ‘‰ Check Out Essential Cooking Tools on Amazon

    * Disclaimer: As an Amazon Associate, I earn from qualifying purchases at no additional cost to you.

    TAGS: #BibimGuksu, #KoreanFood, #ColdNoodles, #Gochujang, #EasyKoreanRecipes

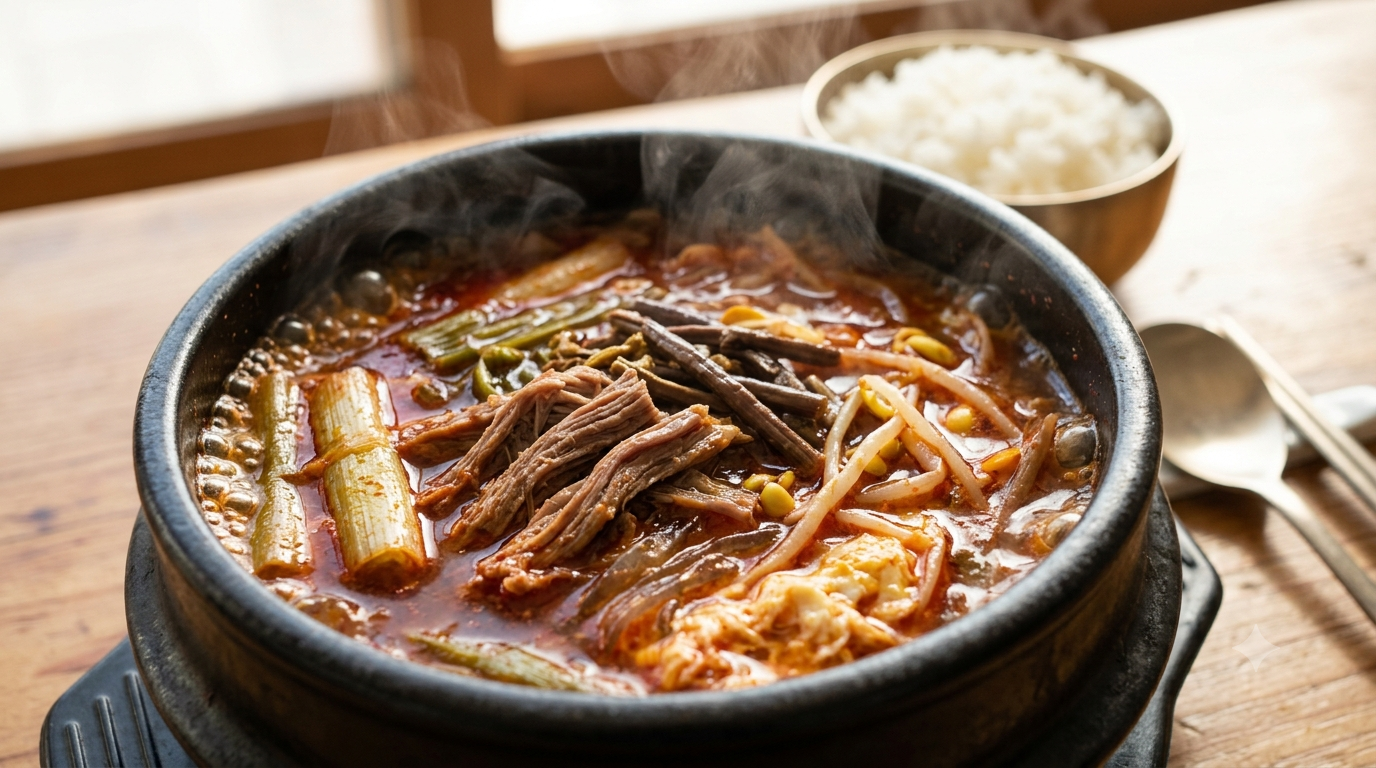
  • Yukgaejang: Spicy Korean Shredded Beef Soup with Rich, Hearty Depth

    Yukgaejang: Spicy Korean Shredded Beef Soup with Rich, Hearty Depth

    Yukgaejang: Spicy Korean Shredded Beef Soup with Rich, Hearty Depth ๐Ÿฒ

    Few soups deliver comfort with quite the same dramatic flair as Yukgaejang, Koreaโ€™s bold, scarlet-hued shredded beef soup. Deeply savory, pleasantly fiery, and packed with tender beef, earthy fernbrake, and silky egg ribbons, this is the kind of bowl that warms you from the inside out. Whether you are craving a restorative meal on a cold evening or exploring authentic Korean home cooking, this hearty soup brings restaurant-worthy depth to your table.

    ๐Ÿ“œ The History of Yukgaejang

    Yukgaejang (์œก๊ฐœ์žฅ) is a beloved Korean soup whose name combines yuk, meaning meat, and gaejang, a spicy soup traditionally associated with dog meat in older Korean culinary history. Over time, beef became the widely accepted and celebrated centerpiece of this dish, creating the rich beef soup enjoyed today.

    Traditionally served during Koreaโ€™s hottest summer days, Yukgaejang is based on the cultural belief that eating hot, nourishing food helps the body manage heat and restore energy. Its signature flavor comes from gochugaru (Korean red pepper flakes), toasted sesame oil, garlic, and a robust beef broth. Every family has its own variation, but shredded brisket, scallions, gosari (fernbrake), and bean sprouts remain classic additions.

    ๐Ÿฅ˜ Classic Yukgaejang Recipe

    Yield: 4 generous servings
    Prep time: 20 minutes
    Cook time: 1 hour 40 minutes
    Total time: About 2 hours

    Ingredients ๐Ÿ›’

    • 1 pound beef brisket or chuck roast
    • 8 cups water or unsalted beef broth
    • 1 small onion, halved
    • 6 garlic cloves, divided
    • 1-inch piece fresh ginger
    • 2 tablespoons sesame oil
    • 3 tablespoons gochugaru (Korean red pepper flakes)
    • 2 tablespoons soy sauce
    • 1 tablespoon Korean soup soy sauce (guk ganjang), optional
    • 1 tablespoon fish sauce, optional
    • 8 ounces soaked gosari (Korean dried fernbrake), cut into shorter lengths
    • 2 cups mung bean sprouts
    • 5 scallions, cut into 2-inch pieces
    • 1 teaspoon salt, plus more to taste
    • ยฝ teaspoon black pepper
    • 2 eggs, lightly beaten
    • Steamed rice, for serving

    ๐Ÿ‘ฉโ€๐Ÿณ How to Make Yukgaejang Step by Step

    1. Simmer the beef. Place the brisket, water or broth, onion, 3 garlic cloves, and ginger in a large soup pot. Bring to a boil, then reduce to a gentle simmer. Cook for 60 to 75 minutes, until the beef is fork-tender. Skim off any foam for a cleaner, clearer broth. ๐Ÿฅฉ
    2. Cool and shred. Transfer the cooked beef to a plate and let it cool just enough to handle. Shred it into thin, bite-size strands with two forks or your hands. Strain the broth and discard the onion, ginger, and aromatics.
    3. Build the spicy seasoning. In the same pot, warm the sesame oil over medium-low heat. Add the remaining minced garlic and gochugaru. Stir constantly for 20 to 30 seconds until fragrant. Do not let the pepper flakes burn. This quick blooming step creates Yukgaejangโ€™s signature red, aromatic broth. ๐ŸŒถ๏ธ
    4. Season the vegetables and beef. Add the shredded beef, gosari, bean sprouts, and scallions. Toss well in the pepper oil. Pour in the reserved beef broth, soy sauce, soup soy sauce, fish sauce, salt, and black pepper.
    5. Simmer for rich flavor. Bring the soup back to a boil, then lower the heat and simmer for 20 to 25 minutes. This gives the fernbrake and scallions time to absorb the savory, spicy broth. ๐Ÿฒ
    6. Add egg ribbons. Slowly drizzle the beaten eggs into the gently simmering soup while stirring in one direction. Let the delicate ribbons set for about 1 minute.
    7. Taste and serve. Adjust the seasoning with extra salt, soy sauce, or gochugaru if desired. Serve piping hot with steamed rice and kimchi for a complete Korean meal. ๐Ÿš

    ๐ŸŒฟ Health Benefits & Smart Cooking Tips

    Yukgaejang is more than a spicy comfort food. Beef provides protein, iron, zinc, and vitamin B12, while bean sprouts add crunch, fiber, and vitamin C. Garlic and ginger contribute warming aromatics, and the capsaicin in gochugaru gives the soup its invigorating heat.

    • Control the heat: Start with 2 tablespoons of gochugaru for a milder soup, then increase to taste.
    • Soak gosari properly: Dried fernbrake should be soaked overnight, then simmered until tender before using.
    • Make it ahead: The flavor becomes even deeper after a night in the refrigerator. Reheat gently and add a splash of water if the broth reduces.
    • Use homemade stock: A long-simmered beef broth gives the most authentic, full-bodied Yukgaejang flavor.

    โ“ Yukgaejang FAQ

    What is the best cut of beef for Yukgaejang?

    Beef brisket is the classic choice because it becomes tender and shreds beautifully after simmering. Chuck roast is an excellent, budget-friendly alternative with rich flavor. Avoid very lean cuts, which can become dry and less satisfying in soup.

    Can I make Yukgaejang without gosari?

    Yes. While gosari gives authentic Yukgaejang its distinctive earthy character, you can substitute sliced shiitake mushrooms, extra bean sprouts, spinach, or napa cabbage. The result will be delicious, though slightly different from the traditional version.

    Is Yukgaejang very spicy?

    Yukgaejang is typically moderately spicy, but the heat level is easy to adjust. Use less gochugaru for a gentler broth, or serve extra red pepper flakes at the table for those who enjoy a stronger kick.

    Can Yukgaejang be made in advance?

    Absolutely. This Korean spicy beef soup is ideal for meal prep and keeps refrigerated for up to 3 days. Store rice separately, then reheat the soup on the stove until hot before serving.

    Can I freeze leftover Yukgaejang?

    Yes. Cool the soup completely and freeze it in airtight portions for up to 2 months. For the best texture, add freshly cooked egg ribbons after reheating rather than freezing the egg in the soup.

    ๐Ÿฅฌ Recommended Ingredients

    Bring authentic Korean flavor to your kitchen with fragrant gochugaru, savory soup soy sauce, and traditional dried gosari. Choose quality ingredients for the deepest, most comforting Yukgaejang broth.

    ๐Ÿ‘‰ Shop Fresh Ingredients on Amazon

    ๐Ÿณ Recommended Kitchen Tools

    A sturdy soup pot or traditional Korean stone pot helps maintain a gentle simmer and keeps every bowl of Yukgaejang beautifully hot from stove to table.

    ๐Ÿ‘‰ Check Out Essential Cooking Tools on Amazon

    * Disclaimer: As an Amazon Associate, I earn from qualifying purchases at no additional cost to you.

    TAGS: #Yukgaejang, #KoreanFood, #SpicyBeefSoup, #KoreanRecipes, #ComfortFood

  • Seolleongtang: Rich and Milky Korean Ox Bone Soup for Pure Comfort

    Seolleongtang: Rich and Milky Korean Ox Bone Soup for Pure Comfort

    Seolleongtang: Rich and Milky Korean Ox Bone Soup for Pure Comfort

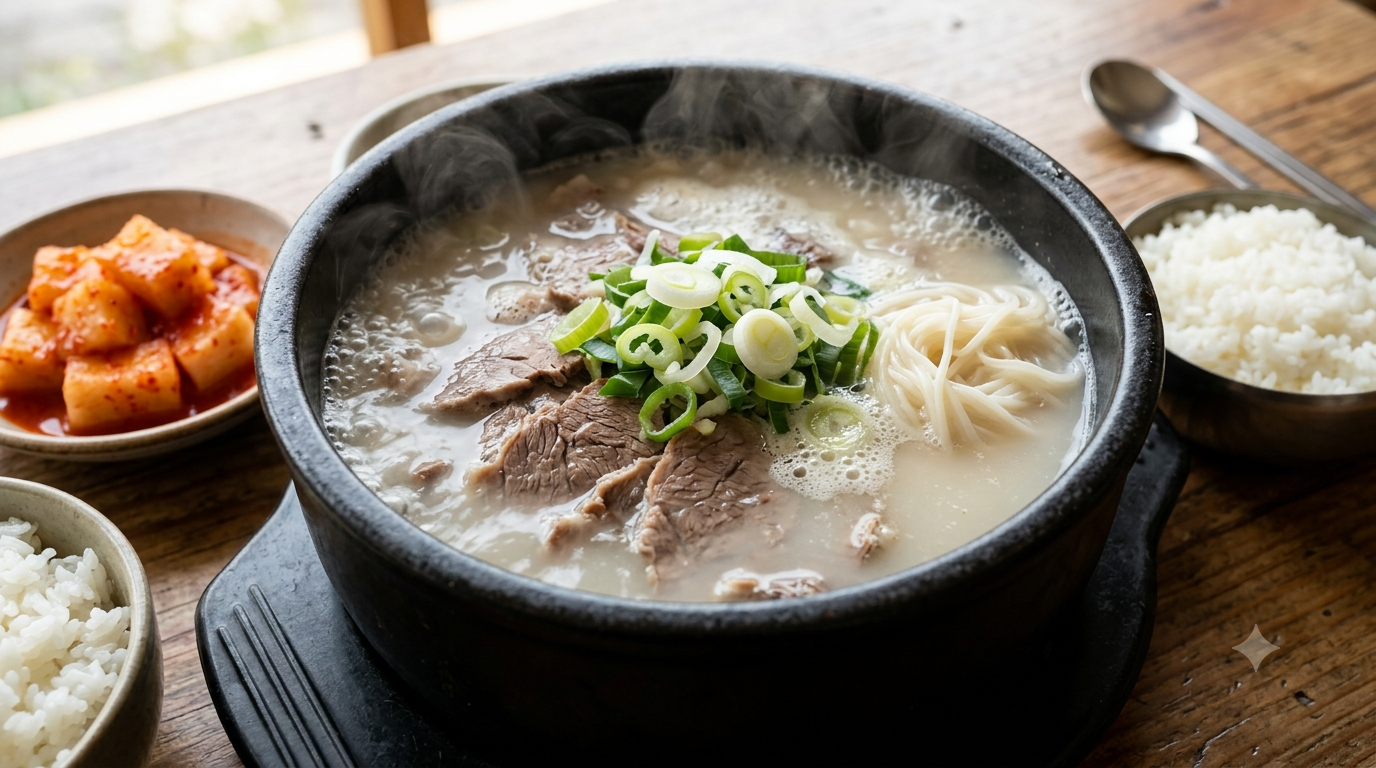
    There is a special kind of comfort in a bowl of Seolleongtang: a pale, milky Korean ox bone soup with a clean, deeply savory flavor that feels soothing from the very first sip. Served steaming hot with tender beef, springy noodles, rice, and punchy kimchi, this is the kind of meal that turns an ordinary day into a cozy ritual. ๐Ÿฒ

    ๐Ÿ“œ The History of Seolleongtang

    Seolleongtang (์„ค๋ ํƒ•) is one of Koreaโ€™s most beloved traditional soups, made by slowly simmering beef bones, brisket, and aromatics until the broth turns naturally cloudy and ivory-colored. The creamy appearance does not come from dairy; it develops when marrow, collagen, fat, and minerals emulsify into the water during a long simmer.

    Its origins are often linked to Seonnongje, an ancient royal agricultural ceremony where Korean kings prayed for a successful harvest. According to popular tradition, beef soup was prepared and shared after the ritual, eventually evolving into the hearty soup now known as seolleongtang. Today, it is a classic Korean comfort food, widely enjoyed for breakfast, lunch, late-night meals, and restorative family dinners.

    ๐Ÿ›’ Ingredients for Authentic Korean Ox Bone Soup

    • 3 pounds beef leg bones, knuckle bones, marrow bones, or a combination
    • 1 pound beef brisket or shank
    • 1 small Korean radish or daikon, peeled and halved
    • 1 onion, halved
    • 4 garlic cloves
    • 12 to 14 cups water, plus more as needed
    • Cooked short-grain rice, for serving
    • Cooked Korean wheat noodles or somyeon, optional
    • Sliced scallions, for serving
    • Salt, black pepper, and sliced green chili, to taste
    • Kimchi and kkakdugi (cubed radish kimchi), for serving

    ๐Ÿฒ How to Make Seolleongtang Step by Step

    1. Soak the bones. ๐Ÿ’ง Place the beef bones in a large pot or bowl and cover with cold water. Soak for 1 to 2 hours, changing the water once if possible. This step helps remove excess blood and creates a cleaner-tasting broth.
    2. Parboil and rinse. Transfer the bones to a large stockpot, cover with fresh water, and bring to a boil for 10 minutes. Drain the pot, then rinse the bones thoroughly under cool running water. Clean the pot as well.
    3. Start the long simmer. ๐Ÿ”ฅ Return the cleaned bones to the pot and add 12 to 14 cups of fresh water. Bring to a boil, then lower the heat to maintain a steady, active simmer. Cook uncovered or partially covered for 5 to 6 hours.
    4. Add the beef and aromatics. After the first hour, add the brisket or shank, radish, onion, and garlic. Simmer until the meat is tender, usually 1ยฝ to 2 hours. Remove the beef, let it cool slightly, then slice it thinly. Refrigerate it until serving.
    5. Build a milky broth. Continue simmering the bones for another 3 to 4 hours. Add hot water as the liquid reduces. For the signature cloudy white broth, keep the simmer lively enough to gently agitate the bones and marrow.
    6. Strain and season at the table. ๐Ÿฅ„ Strain the broth through a fine sieve. Return it to the pot and reheat. Traditionally, seolleongtang is served lightly seasoned so each diner can add salt, pepper, scallions, and chili according to taste.
    7. Serve the comforting bowl. Divide sliced beef, rice, and optional noodles among large bowls. Ladle over the hot broth, scatter with scallions, and serve immediately with kimchi or kkakdugi on the side.

    ๐ŸŒฟ Health Benefits and Smart Cooking Tips

    Seolleongtang is valued for its protein-rich beef, warming hydration, and satisfying gelatinous texture from slowly cooked bones. While bone broth should not be treated as a miracle food, it can be a nourishing addition to a balanced diet, especially when paired with rice, vegetables, and fermented kimchi.

    • Skim for a lighter soup: Chill the finished broth overnight and lift off the solidified fat before reheating.
    • Do not oversalt the pot: Korean diners traditionally season individual bowls, preserving the clean flavor of the broth.
    • Use a pressure cooker: It can shorten the initial bone-cooking time, though a long stovetop simmer delivers the most traditional flavor.
    • Freeze extra broth: Portion cooled broth into containers and freeze for up to 3 months.

    โ“ Seolleongtang FAQ

    What are the best bones for seolleongtang?

    A combination of beef knuckle bones, leg bones, and marrow bones creates the best balance of body, richness, and milky color. Ask a Korean butcher or local butcher for soup bones or ox bones.

    Why is my Korean ox bone soup not milky white?

    The broth may be too gently simmered or cooked for too short a time. A stronger simmer helps emulsify marrow and collagen into the liquid. Using a mix of marrow and joint bones also improves the color and texture.

    Can I make seolleongtang ahead of time?

    Yes. In fact, it is ideal for meal prep. Make the broth one day ahead, chill it, remove excess fat if desired, and reheat gently before serving with freshly cooked rice, noodles, and scallions.

    Can I substitute chicken or pork bones?

    You can make a delicious bone broth with other bones, but it will not taste like traditional seolleongtang. For its distinctively mild, beefy, milky profile, beef or ox bones are essential.

    What should I serve with seolleongtang?

    Serve it with steamed short-grain rice, sliced scallions, salt, pepper, and Korean kimchi. Kkakdugi is especially popular because its crisp, spicy, tangy flavor cuts through the rich broth beautifully.

    ๐Ÿฅฉ Recommended Ingredients

    Bring authentic Korean comfort to your kitchen with quality beef soup bones, fragrant scallions, and traditional kimchi. Choose fresh, well-marbled bones for the richest, silkiest seolleongtang broth.

    ๐Ÿ‘‰ Shop Fresh Ingredients on Amazon

    ๐Ÿฒ Recommended Kitchen Tools

    A roomy stockpot, fine-mesh strainer, and traditional Korean soup bowls make long-simmered broth easier to prepare and more enjoyable to serve.

    ๐Ÿ‘‰ Check Out Essential Cooking Tools on Amazon

    * Disclaimer: As an Amazon Associate, I earn from qualifying purchases at no additional cost to you.

    TAGS: #Seolleongtang, #KoreanFood, #BoneBroth, #ComfortFood, #KoreanSoup

  • Jjamppong: Fiery Korean Spicy Seafood Noodle Soup Packed with Smoky Flavor

    Jjamppong: Fiery Korean Spicy Seafood Noodle Soup Packed with Smoky Flavor

    Jjamppong: Fiery Korean Spicy Seafood Noodle Soup with Smoky Flavor ๐Ÿ”ฅ๐Ÿœ

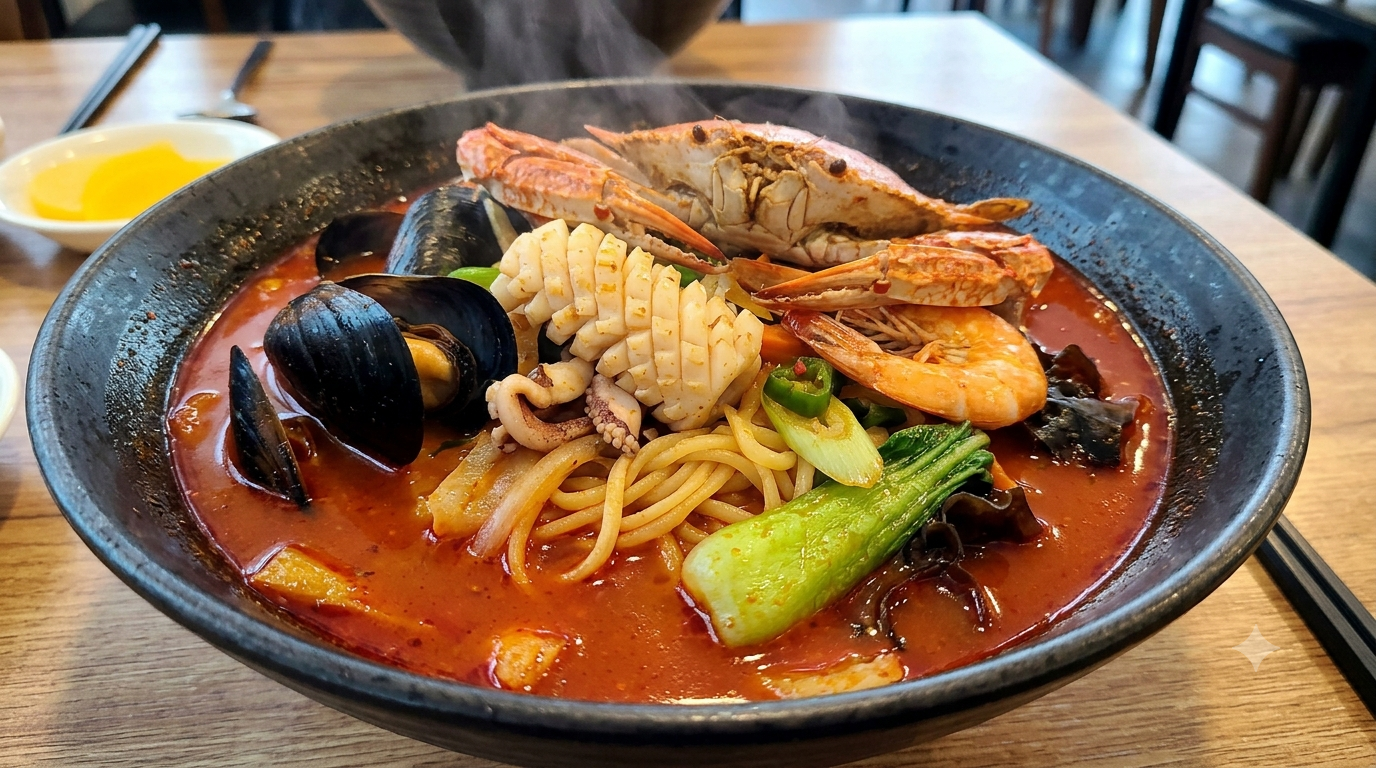
    One spoonful of Jjamppong and you understand why this Korean spicy seafood noodle soup has such a devoted following. Its deeply red broth is fragrant with wok-fired aromatics, tender seafood, crisp vegetables, and springy noodlesโ€”all wrapped in a warming, smoky chile-garlic heat that wakes up every taste bud.

    This easy homemade Jjamppong recipe captures the restaurant-style character of the dish without requiring a professional wok burner. Use fresh or frozen seafood, sturdy wheat noodles, and Korean chile flakes to create a satisfying bowl that is bold, brothy, and gloriously spicy.

    ๐Ÿ“œ The History of Jjamppong

    Jjamppong is a beloved example of Korean-Chinese cuisine, a culinary tradition developed by Chinese immigrant communities in Korea. While its name is often associated with Japanese champon-style noodle soups, Korean Jjamppong evolved into a distinctly different dish: hotter, redder, and more intensely seasoned.

    By the mid-20th century, Korean Chinese restaurants had popularized Jjamppong alongside dishes such as jajangmyeon and tangsuyuk. The signature red broth comes from frying Korean chile flakes in oil with garlic, ginger, and vegetablesโ€”a technique that creates the dishโ€™s iconic smoky aroma. Today, Jjamppong is a go-to comfort food in Korea, especially on chilly days or whenever a spicy noodle craving strikes.

    ๐Ÿงพ Ingredients for Korean Seafood Jjamppong

    • 10 ounces fresh wheat noodles, udon, or ramen-style noodles
    • 2 tablespoons neutral oil, such as avocado or vegetable oil
    • 1 tablespoon Korean chile oil (gochugireum), optional but recommended
    • 1 small onion, thinly sliced
    • 3 garlic cloves, minced
    • 1 teaspoon grated ginger
    • 2 tablespoons gochugaru (Korean red pepper flakes)
    • 1 tablespoon soy sauce
    • 1 teaspoon oyster sauce
    • 4 cups seafood or chicken stock
    • 1 cup napa cabbage, roughly chopped
    • 1 small zucchini, sliced into half-moons
    • 1 cup mushrooms, sliced
    • 1 cup mixed seafood: shrimp, squid, mussels, or clams
    • 2 green onions, cut into 2-inch pieces
    • Salt and black pepper, to taste
    • Optional garnish: toasted sesame oil, cilantro, or additional sliced green onion

    ๐Ÿ‘ฉโ€๐Ÿณ How to Make Jjamppong Step by Step

    1. Cook the noodles. ๐Ÿœ Bring a pot of water to a boil and cook the noodles according to package directions until just tender. Drain, rinse briefly under cool water to stop cooking, and divide between two large serving bowls.
    2. Build the smoky base. ๐Ÿ”ฅ Heat a wok or heavy pot over medium-high heat. Add neutral oil and Korean chile oil. Stir-fry the onion for 2 minutes, then add garlic and ginger. Cook for 30 seconds until fragrant.
    3. Bloom the chile flakes. Add gochugaru and stir continuously for 15 to 20 seconds. Be careful not to burn it. This quick frying step creates the deep red, smoky flavor that defines great Jjamppong.
    4. Add sauce and vegetables. Stir in soy sauce and oyster sauce. Add napa cabbage, zucchini, and mushrooms, tossing for 2 to 3 minutes until the vegetables begin to soften.
    5. Simmer the broth. ๐Ÿฅฃ Pour in the stock and bring it to a lively simmer. Cook for 5 minutes so the broth takes on the flavor of the vegetables and spices.
    6. Cook the seafood. Add shrimp, squid, mussels, clams, or your chosen seafood. Simmer for 3 to 5 minutes, until shrimp are pink, squid is tender, and shellfish have opened. Discard any unopened mussels or clams.
    7. Finish and serve. Add green onions and season with salt and black pepper. Ladle the fiery seafood broth over the noodles. Finish with a few drops of sesame oil if desired, then serve immediately while steaming hot. ๐ŸŒถ๏ธ

    ๐Ÿ’š Health Benefits and Helpful Tips

    Jjamppong can be a nourishing one-bowl meal. Seafood provides protein, iodine, selenium, and omega-3 fatty acids, while cabbage, zucchini, mushrooms, and onions contribute fiber and plant-based nutrients. Gochugaru contains capsaicin, the compound responsible for its warming heat.

    • Control the spice: Start with 1 tablespoon gochugaru for a milder broth, then add more to taste.
    • Use frozen seafood wisely: Thaw it overnight and pat it dry before cooking to avoid watering down the broth.
    • For richer flavor: Use seafood stock or add a spoonful of Korean soup soy sauce.
    • For a vegetarian version: Replace seafood with tofu, king oyster mushrooms, and vegetable stock.
    • Eat it fresh: Store broth and noodles separately if making ahead; noodles absorb broth quickly.

    โ“ Jjamppong FAQ

    What seafood is best for Jjamppong?

    A combination of shrimp, squid, mussels, and clams creates the most authentic seafood Jjamppong flavor. However, shrimp and squid alone make an excellent, accessible version.

    Can I make Jjamppong ahead of time?

    Yes. Make the spicy broth up to two days ahead and refrigerate it in an airtight container. Cook the noodles fresh and reheat the broth gently before serving. Add delicate seafood only when reheating for the best texture.

    What noodles should I use for Korean Jjamppong?

    Fresh Chinese-style wheat noodles are traditional, but udon, ramen noodles, or thick egg noodles work well. Choose noodles with enough chew to stand up to the robust broth.

    Can I substitute gochugaru with regular red pepper flakes?

    You can, but the result will be sharper and less traditionally Korean. Gochugaru has a fruitier, mildly smoky flavor and a softer heat, making it the best choice for authentic Jjamppong.

    How do I make Jjamppong less spicy?

    Reduce the gochugaru, skip the chile oil, and add a little extra stock. A side of plain rice can also help balance the heat without changing the broth.

    ๐Ÿฅฌ Recommended Ingredients

    Bring authentic Korean heat and depth to your homemade Jjamppong with fresh gochugaru, Korean chile oil, quality seafood stock, and pantry-ready noodles.

    ๐Ÿ‘‰ Shop Fresh Ingredients on Amazon

    ๐Ÿณ Recommended Kitchen Tools

    A carbon-steel wok or heavy-bottomed soup pot helps develop the quick, smoky stir-fried flavor that makes spicy seafood Jjamppong unforgettable.

    ๐Ÿ‘‰ Check Out Essential Cooking Tools on Amazon

    * Disclaimer: As an Amazon Associate, I earn from qualifying purchases at no additional cost to you.

    TAGS: #Jjamppong, #KoreanFood, #SeafoodNoodleSoup, #SpicySoup, #KoreanChineseCuisine

  • Homemade Korean Mandu: Juicy Dumplings with a Comforting Story

    Homemade Korean Mandu: Juicy Dumplings with a Comforting Story

    Homemade Korean Mandu: Juicy Dumplings with a Comforting Story ๐ŸฅŸ

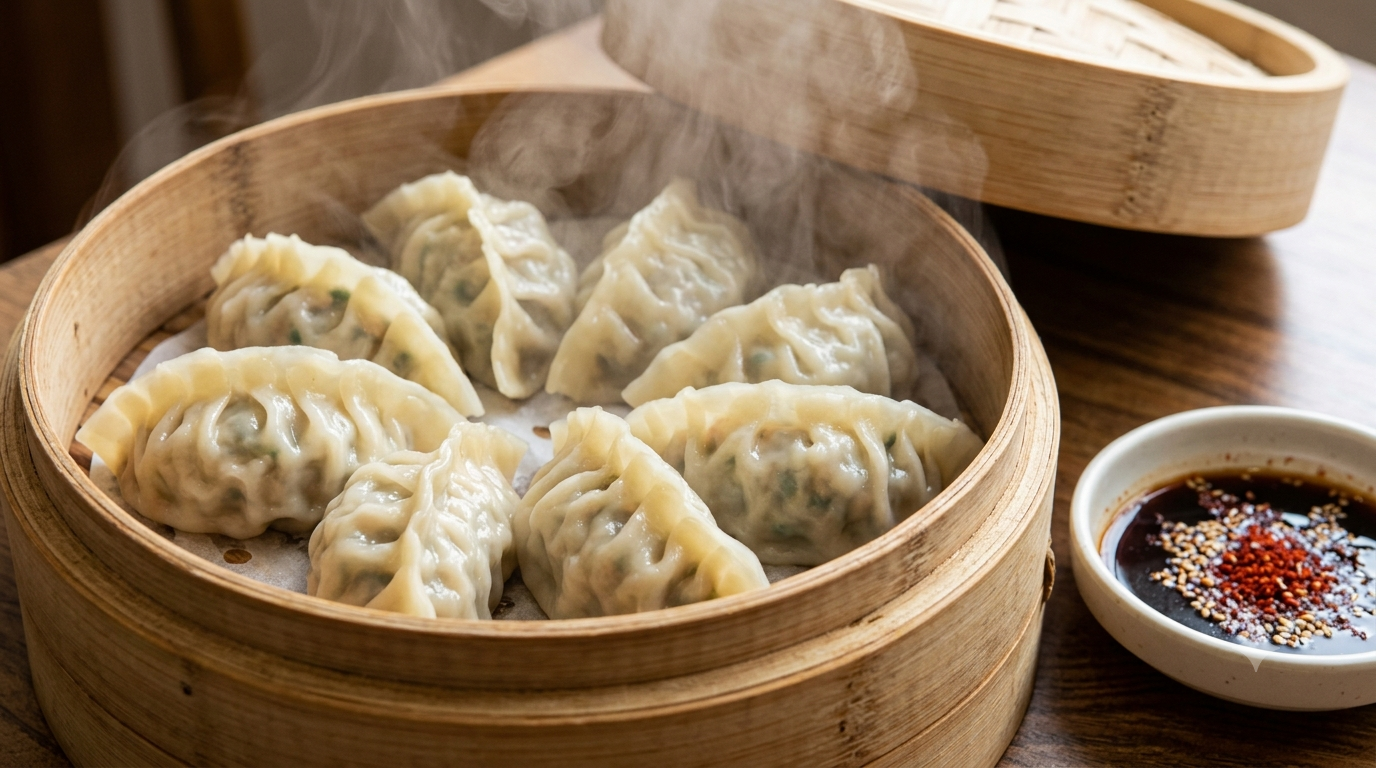
    Few foods are as universally comforting as a warm dumpling, but Korean mandu brings something especially memorable to the table: a tender wrapper, a savory filling, and endless ways to cook it. Steamed, pan-fried, boiled, or dropped into soup, mandu is the kind of meal that turns a simple gathering into a feast.

    This easy homemade mandu recipe makes flavorful pork and vegetable Korean dumplings with tofu, kimchi, and aromatic sesame oil. Serve them crisp-bottomed with a tangy dipping sauce, or freeze a batch for quick weeknight comfort food.

    ๐Ÿ“œ The History of Korean Mandu

    Mandu is believed to have arrived on the Korean Peninsula through Central Asian and Mongolian trade routes during the Goryeo Dynasty, although its exact origins remain debated. Over centuries, Korea made the dumpling entirely its own. Regional recipes developed across the country, from large northern-style dumplings filled with beef and tofu to spicy kimchi mandu popular in Seoul and beyond.

    Today, mandu is a beloved everyday food and an important holiday dish, especially during Seollal, the Korean Lunar New Year. Families often enjoy mandu in tteokguk, a rice-cake soup said to symbolize another year of life. This recipe celebrates that tradition with a practical, flavor-packed filling you can make in any home kitchen.

    ๐Ÿงบ Ingredients for Korean Mandu

    • 30 round dumpling wrappers, store-bought or homemade
    • 8 ounces ground pork
    • 1 cup napa cabbage, finely chopped
    • 1/2 cup well-fermented kimchi, finely chopped
    • 1/2 block firm tofu, drained and crumbled
    • 2 scallions, finely sliced
    • 2 garlic cloves, minced
    • 1 tablespoon soy sauce
    • 1 teaspoon toasted sesame oil
    • 1 teaspoon grated fresh ginger
    • 1/2 teaspoon black pepper
    • 1/2 teaspoon kosher salt, plus more as needed
    • Neutral oil for pan-frying

    Quick Mandu Dipping Sauce ๐Ÿฅข

    • 2 tablespoons soy sauce
    • 1 tablespoon rice vinegar
    • 1 teaspoon toasted sesame oil
    • 1 teaspoon gochugaru or red pepper flakes, optional
    • 1 sliced scallion and toasted sesame seeds, optional

    ๐Ÿ‘ฉโ€๐Ÿณ How to Make Korean Mandu Step by Step

    1. Salt and squeeze the cabbage. Place the chopped napa cabbage in a bowl, sprinkle with salt, and let it sit for 10 minutes. Squeeze out as much moisture as possible using clean hands or a kitchen towel. This step keeps your mandu filling from becoming watery.
    2. Prepare the filling ๐Ÿฅฌ In a large bowl, combine the ground pork, squeezed cabbage, kimchi, crumbled tofu, scallions, garlic, ginger, soy sauce, sesame oil, and black pepper. Mix gently until evenly combined. Avoid overmixing, which can make the filling dense.
    3. Test the seasoning. Cook a teaspoon of filling in a small skillet until fully done. Taste it, then add a pinch more salt, soy sauce, or pepper if needed. This is the easiest way to create perfectly seasoned mandu.
    4. Fill the wrappers ๐ŸฅŸ Place one dumpling wrapper in your palm. Add about 1 tablespoon of filling to the center. Moisten the wrapper edge with water, fold it in half, and press firmly to seal. Create small pleats if desired, but a tightly sealed half-moon shape works beautifully.
    5. Pan-fry for crispy bottoms ๐Ÿ”ฅ Heat 1 tablespoon neutral oil in a nonstick skillet over medium heat. Arrange mandu in a single layer and fry for 2 to 3 minutes, until the bottoms turn golden.
    6. Steam and finish. Carefully add 1/3 cup water to the skillet and immediately cover. Steam for 6 to 8 minutes, until the pork is cooked through and the wrappers are tender. Uncover and cook for 1 to 2 minutes more to re-crisp the bottoms.
    7. Serve hot. Whisk the dipping sauce ingredients together. Serve the mandu immediately with sauce, kimchi, cucumber salad, or a bowl of steamed rice.

    ๐ŸŒฟ Health Benefits and Smart Cooking Tips

    Korean mandu can be a balanced meal when filled with lean protein and vegetables. Pork provides protein and essential B vitamins, while napa cabbage and kimchi add fiber. Fermented kimchi may also contribute beneficial probiotics, though cooking reduces some live cultures. Tofu adds plant-based protein and creates a softer, juicier texture.

    • For a lighter mandu: Use ground chicken, turkey, or extra-firm tofu instead of pork.
    • For gluten-free mandu: Choose certified gluten-free wrappers and tamari instead of regular soy sauce.
    • For extra crispness: Let the pan-fried dumplings sit uncovered for one minute before serving.
    • For meal prep: Freeze uncooked mandu in a single layer, then transfer to a freezer bag for up to 2 months.

    โ“ Korean Mandu FAQ

    What is the best meat for Korean mandu?

    Ground pork is a classic choice because it stays juicy and flavorful. Ground beef, chicken, turkey, or a pork-and-beef blend also work well. For traditional northern Korean-style mandu, beef and tofu are especially popular.

    Can I make mandu ahead of time?

    Yes. Assemble the dumplings, place them on a parchment-lined tray, and freeze until firm. Transfer them to an airtight container or freezer bag. Cook frozen mandu directly from the freezer; simply add 2 to 3 extra minutes during steaming.

    How do I keep mandu wrappers from breaking?

    Keep wrappers covered with a lightly damp towel while shaping. Do not overfill them, and press out trapped air before sealing. If a wrapper feels dry, brush the edge with a little water before folding.

    Can I cook Korean mandu without pan-frying?

    Absolutely. Steam mandu for 10 to 12 minutes, boil them until they float and cook for another 2 minutes, or add them to Korean dumpling soup. Pan-frying simply adds the irresistible golden crispy bottom.

    What can I substitute for kimchi in mandu?

    If you prefer a mild filling, replace kimchi with extra napa cabbage, chopped zucchini, shiitake mushrooms, or garlic chives. Add a small splash of rice vinegar and a pinch of chili flakes if you still want a little tang and heat.

    ๐ŸŒฑ Recommended Ingredients

    Make every bite taste more authentic with fresh kimchi, toasted sesame oil, quality soy sauce, and Korean dumpling wrappers.

    ๐Ÿ‘‰ Shop Fresh Ingredients on Amazon

    ๐Ÿณ Recommended Kitchen Tools

    A reliable nonstick skillet, bamboo steamer, mixing bowls, and a sturdy spatula make homemade mandu easier to shape and cook perfectly.

    ๐Ÿ‘‰ Check Out Essential Cooking Tools on Amazon

    * Disclaimer: As an Amazon Associate, I earn from qualifying purchases at no additional cost to you.

    TAGS: #KoreanMandu, #KoreanDumplings, #KimchiRecipe, #AsianCooking, #HomemadeDumplings


  • Budae Jjigae: Koreaโ€™s Bold, Comforting Army Stew

    Budae Jjigae: Koreaโ€™s Bold, Comforting Army Stew

    Budae Jjigae: Koreaโ€™s Bold, Comforting Army Stew ๐Ÿฒ

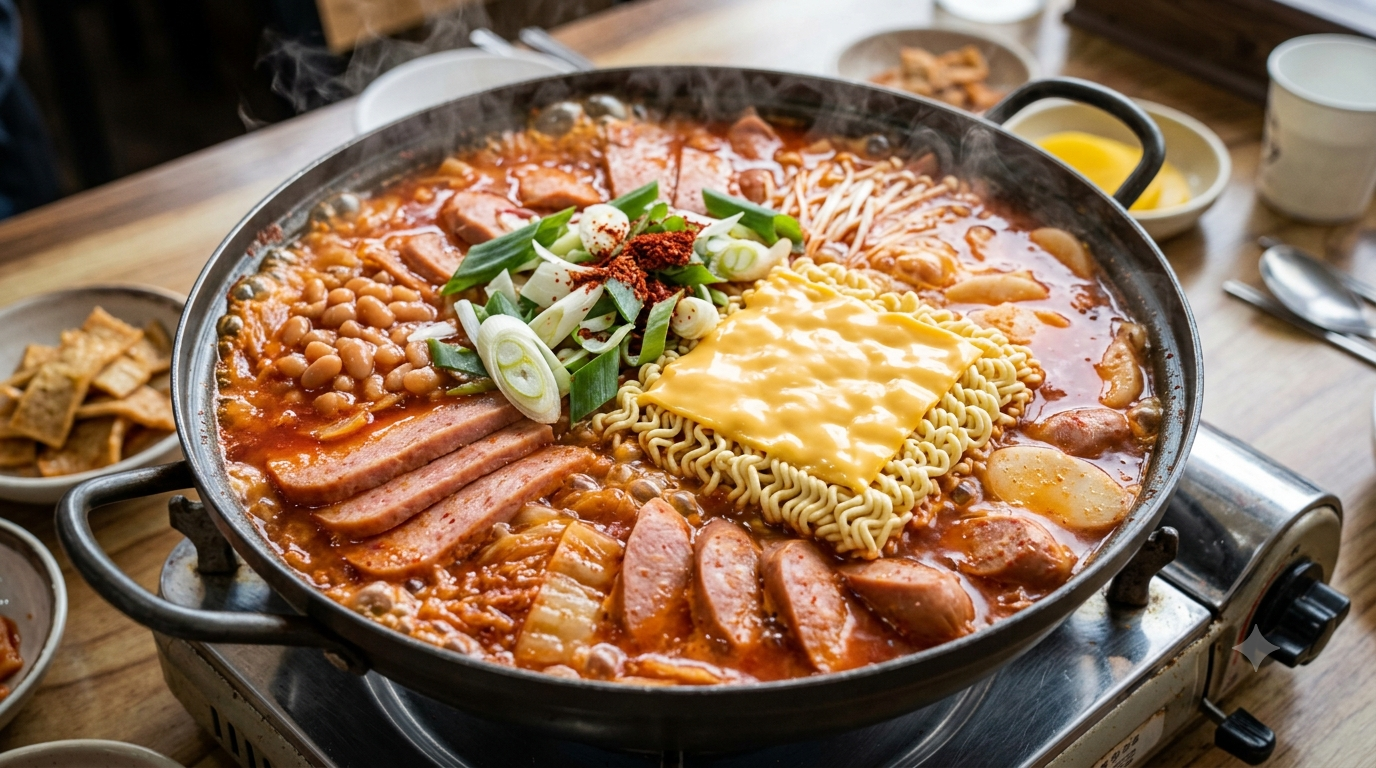
    Few dishes tell a story as vividly as Budae Jjigae, Koreaโ€™s famously hearty โ€œarmy stew.โ€ Bubbling with spicy gochujang broth, kimchi, ramen noodles, sausage, Spam, tofu, and melted cheese, this one-pot meal is unapologetically rich, savory, and deeply comforting. It is the kind of communal dish made for cold evenings, casual dinner parties, and anyone craving a big bowl of Korean comfort food.

    ๐Ÿ“œ The History Behind Budae Jjigae

    Budae Jjigae literally translates to โ€œarmy base stew.โ€ The dish emerged in the years following the Korean War, when food shortages led local communities near United States military bases to creatively use surplus ingredients such as canned meat, hot dogs, baked beans, and processed cheese. These Western pantry staples were blended with classic Korean flavors including kimchi, gochugaru (Korean red pepper flakes), garlic, and fermented soybean pastes.

    What began as a practical, resourceful meal became a beloved Korean restaurant staple. Today, Budae Jjigae in Seoul and across South Korea is often served in a wide shallow pot at the center of the table, where diners cook noodles, vegetables, and proteins together. Its distinctive mix of Korean and American ingredients makes it one of the most memorable examples of modern Korean fusion cuisine.

    ๐Ÿฅ˜ Easy Homemade Budae Jjigae Recipe

    This recipe serves four and delivers a balanced broth: spicy, tangy, smoky, and savory. Adjust the heat with extra gochugaru or sliced fresh chili peppers.

    Ingredients

    • 2 cups well-fermented kimchi, roughly chopped
    • 1 tablespoon kimchi brine, optional but recommended
    • 4 cups low-sodium chicken or vegetable broth
    • 1 tablespoon gochujang (Korean chili paste)
    • 1 tablespoon gochugaru (Korean red pepper flakes)
    • 1 tablespoon soy sauce
    • 1 teaspoon sugar or honey
    • 3 garlic cloves, minced
    • 4 ounces Spam or luncheon meat, sliced
    • 4 ounces smoked sausage or hot dogs, sliced
    • 1 cup firm tofu, cubed
    • 1/2 cup canned baked beans
    • 1 cup mushrooms, sliced
    • 1 small onion, sliced
    • 1 package instant ramen noodles
    • 2 slices American cheese or mild cheddar
    • 2 scallions, sliced, for garnish

    ๐Ÿ‘ฉโ€๐Ÿณ Step-by-Step Budae Jjigae Instructions

    1. Prepare the spicy broth ๐ŸŒถ๏ธIn a bowl, whisk together the broth, gochujang, gochugaru, soy sauce, sugar, minced garlic, and kimchi brine. Stir until the chili paste dissolves. This creates the signature spicy Budae Jjigae broth.
    2. Arrange the ingredients in a pot ๐Ÿฅ˜Use a wide, shallow pot or Dutch oven. Arrange kimchi, Spam, sausage, tofu, baked beans, mushrooms, and onion in separate sections. This traditional presentation looks inviting and allows each ingredient to retain its character.
    3. Add broth and simmer ๐Ÿ”ฅPour the prepared broth over the ingredients. Bring the stew to a boil over medium-high heat, then reduce to a lively simmer. Cook for 10 to 12 minutes, until the kimchi softens and the meats are heated through.
    4. Add ramen noodles ๐ŸœPlace the ramen noodles in the center of the pot. Simmer for 3 to 4 minutes, turning the noodles gently as they soften. Avoid overcooking; the noodles should remain pleasantly chewy.
    5. Finish with cheese and scallions ๐Ÿง€Lay the cheese over the hot stew and allow it to melt for about one minute. Scatter scallions on top, then serve immediately with steamed rice, extra kimchi, and small side dishes.

    ๐ŸŒฟ Health Benefits and Smart Cooking Tips

    While Budae Jjigae is an indulgent dish, it can be adapted into a more balanced meal. Kimchi contains beneficial fermented compounds and adds bold flavor without needing much extra seasoning. Tofu contributes plant-based protein, while mushrooms, onions, and scallions add fiber and micronutrients.

    • Lower the sodium: Choose reduced-sodium broth, rinse canned meats briefly, and use less Spam or sausage.
    • Add more vegetables: Napa cabbage, zucchini, bok choy, bean sprouts, and spinach all work beautifully.
    • Make it vegetarian: Replace meat with plant-based sausage, extra tofu, mushrooms, and vegetable broth.
    • Control the spice: Start with half the gochugaru if you are new to Korean food, then add more at the table.
    • Serve immediately: Ramen absorbs broth quickly, so Budae Jjigae tastes best fresh from the pot.

    โ“ Budae Jjigae FAQ

    What is the best meat for Budae Jjigae?

    The classic combination is Spam and sliced hot dogs or smoked sausage. For a fuller stew, add thinly sliced pork belly, bacon, ground beef, or leftover roast chicken. A mix of smoky and savory proteins gives the broth its distinctive flavor.

    Can I make Budae Jjigae ahead of time?

    Yes. Prepare the broth and chop all ingredients up to one day ahead. Store them separately in the refrigerator. Assemble and simmer just before serving, then add ramen at the very end for the best texture.

    What can I substitute for Spam in Korean army stew?

    Try canned ham, turkey sausage, kielbasa, plant-based luncheon meat, or extra-firm tofu. For a less processed version, use shredded chicken and mushrooms, although the flavor will be less traditional.

    Is Budae Jjigae very spicy?

    It is typically medium to hot, but it is easy to customize. Use less gochugaru and gochujang for a milder broth. Cheese, rice, and extra broth also help soften the heat.

    Do I need baked beans for authentic Budae Jjigae?

    Baked beans are common in many traditional versions because they provide a subtle sweetness and reflect the dishโ€™s army-base roots. They are optional, but adding a small amount gives the stew a more classic flavor.

    ๐Ÿฅฌ Recommended Ingredients

    Bring authentic Korean flavor to your kitchen with fresh kimchi, quality gochujang, gochugaru, ramen, and pantry-ready stew essentials.

    ๐Ÿ‘‰ Shop Fresh Ingredients on Amazon

    ๐Ÿณ Recommended Kitchen Tools

    A wide shallow pot, dependable Dutch oven, ladle, and heat-safe chopsticks make serving bubbling Budae Jjigae easy and enjoyable.

    ๐Ÿ‘‰ Check Out Essential Cooking Tools on Amazon

    * Disclaimer: As an Amazon Associate, I earn from qualifying purchases at no additional cost to you.

    TAGS: #BudaeJjigae, #KoreanFood, #KoreanArmyStew, #KimchiRecipe, #ComfortFood